The doors here run from a single strip of caution tape, which needs no cutting at all, to student-made monsters, named ghosts and a month-long build that changes each week.
Time and class size pick the winner: with one free evening, choose a few-sheet design like Frankenstein or a single oversized bat, and with a class that wants a hand in it, choose the named ghosts or the paper monsters.
A scarecrow or pumpkin patch can stay up through November, so it suits a teacher who doesn’t want to redo the door twice.
1. Haunted House
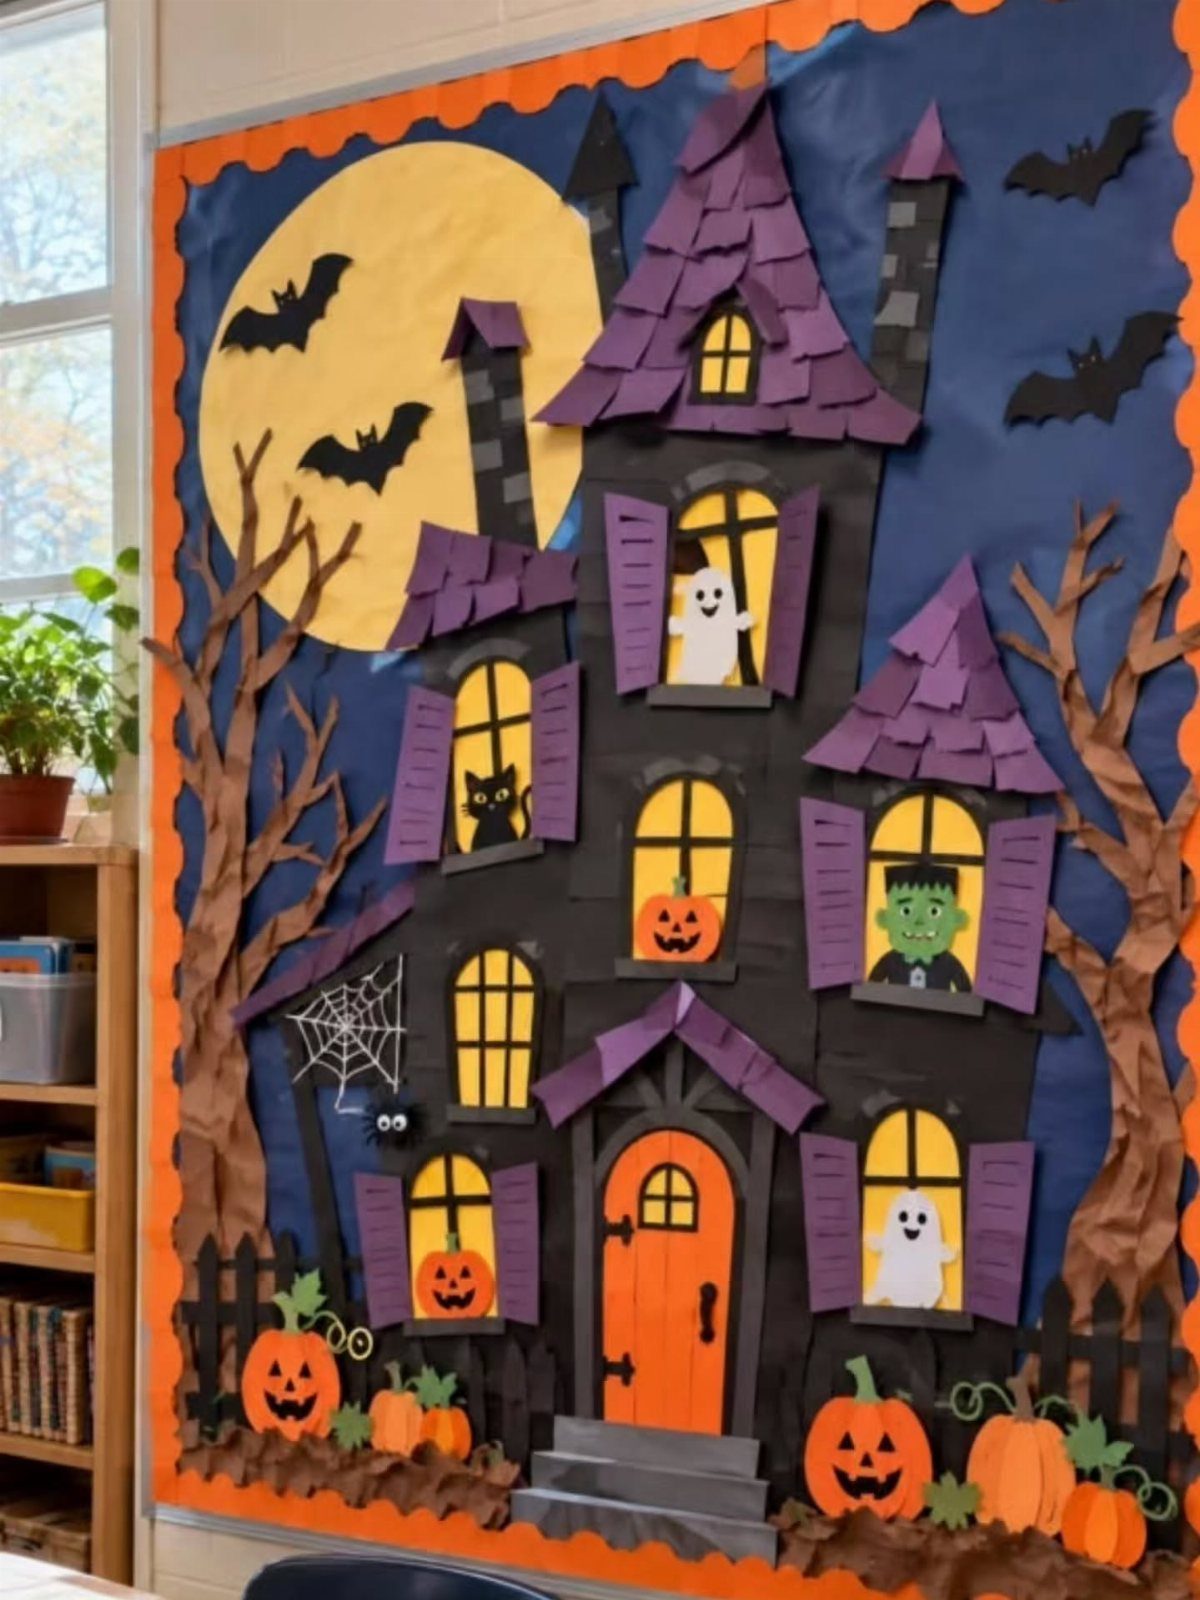
A haunted house door works because the door itself becomes the entrance. Here the orange panel does that job, with a purple roofline above it and a yellow moon behind.
Cut the roof, windows and moon from construction paper, and keep the windows dark so the monsters inside stand out.
Let students make the window monsters themselves. Each one takes a few minutes, and the door fills up fast.
2. Pumpkin Patch
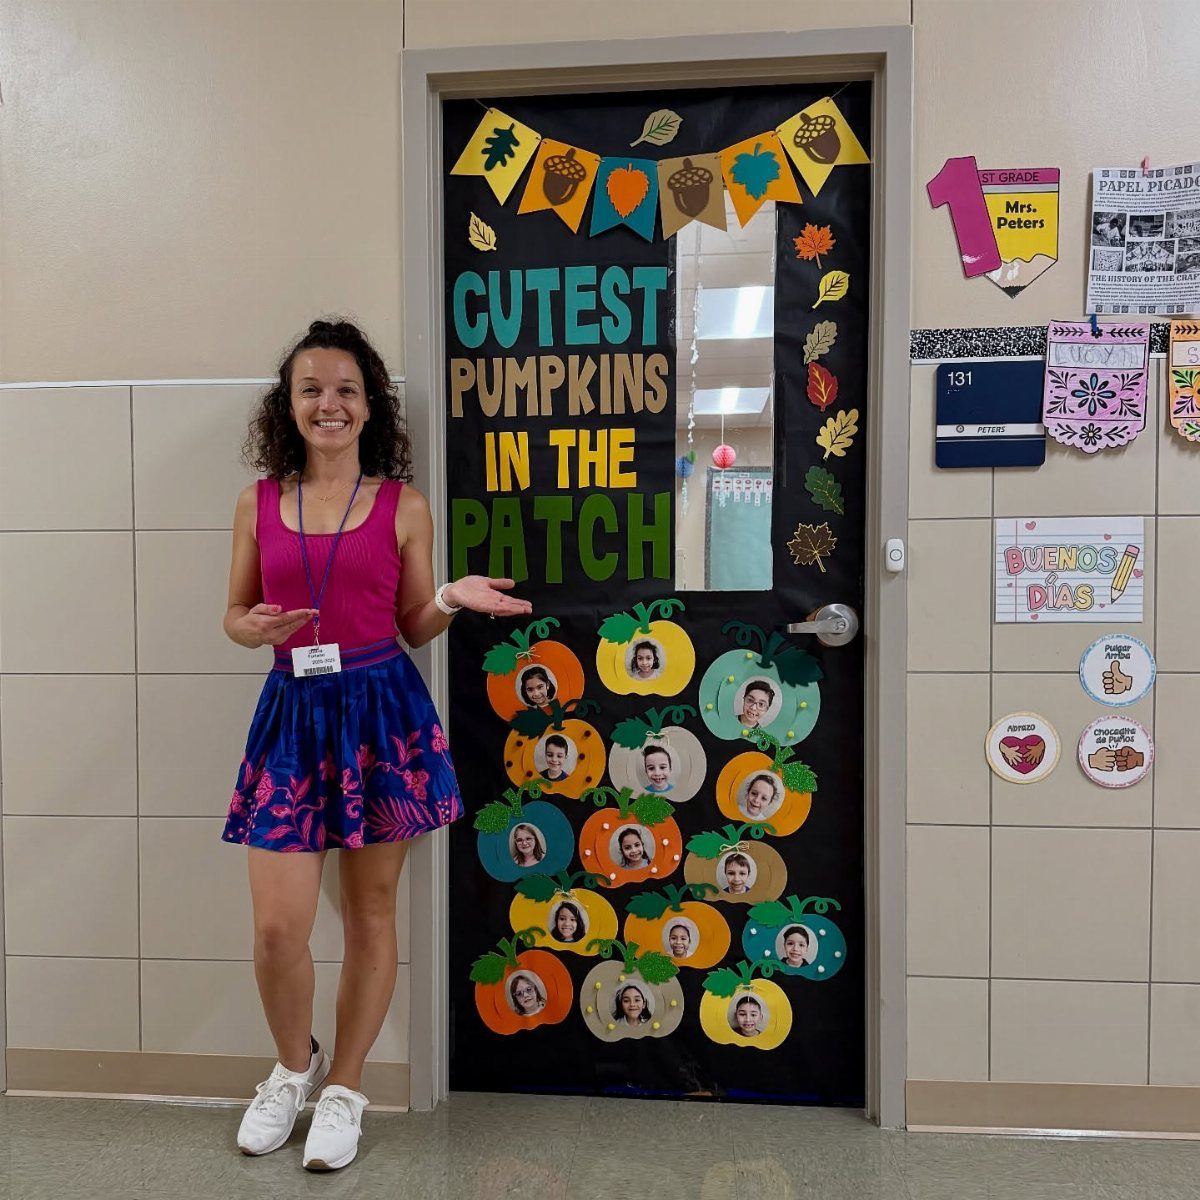
Student photos turn a pumpkin patch into a door every child wants to find. Each face sits in a pumpkin, and the "cutest pumpkins" line does the rest.
I would print the photos at one size so the rows look even.
Cut the pumpkins from orange paper, and add a strip of bunting across the top for the autumn feel. This one runs past Halloween into November, so it earns a longer stay on the door.
3. Witch’s Cauldron
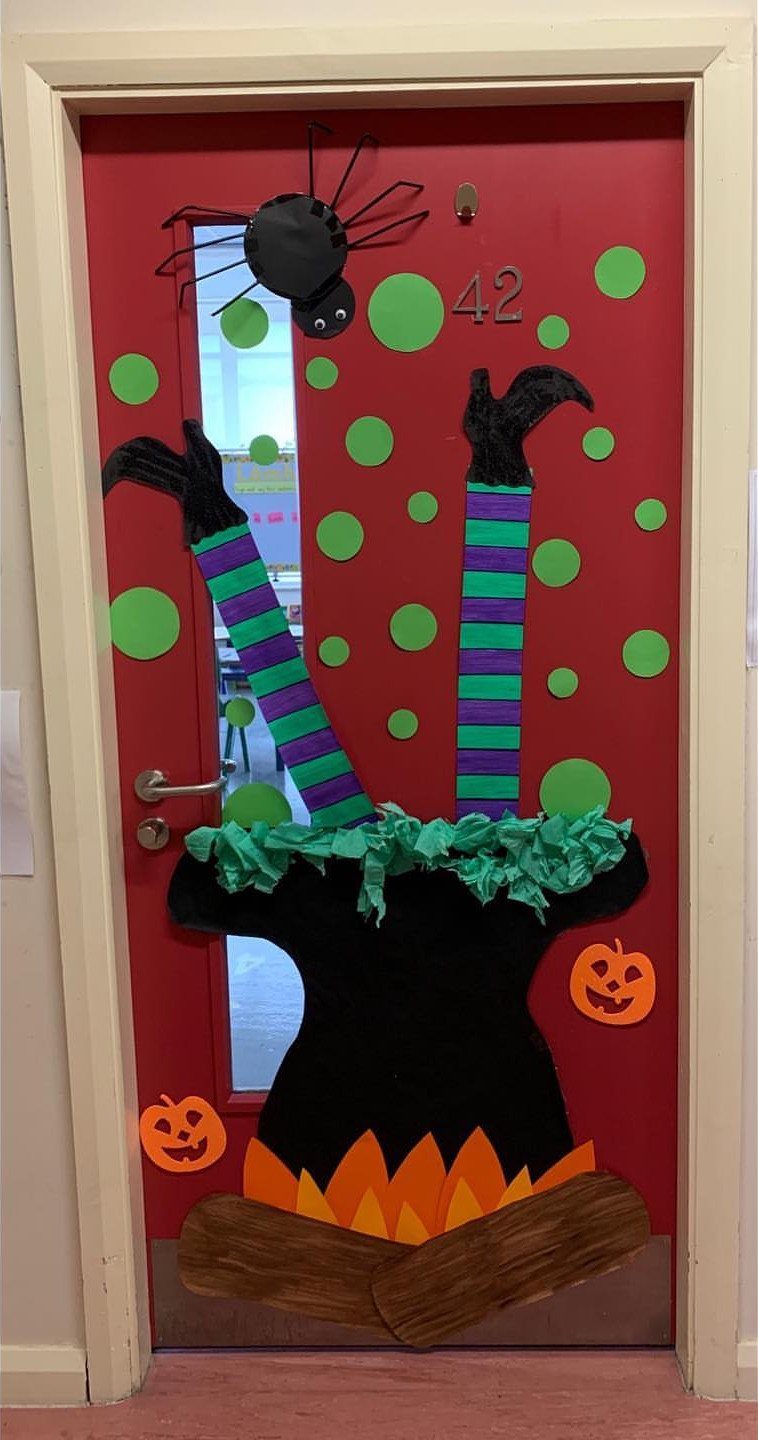
Legs sticking out of a cauldron get the laugh before anyone reads a word. A black paper cauldron, orange flames and green bubbles carry the whole scene.
On a red door, the black cauldron reads clearly.
Stripe the legs with two colors of paper, and add one small spider as a surprise. Keep the shapes big and simple, since people see this door from down the hall.
4. Colorful Paper Monsters
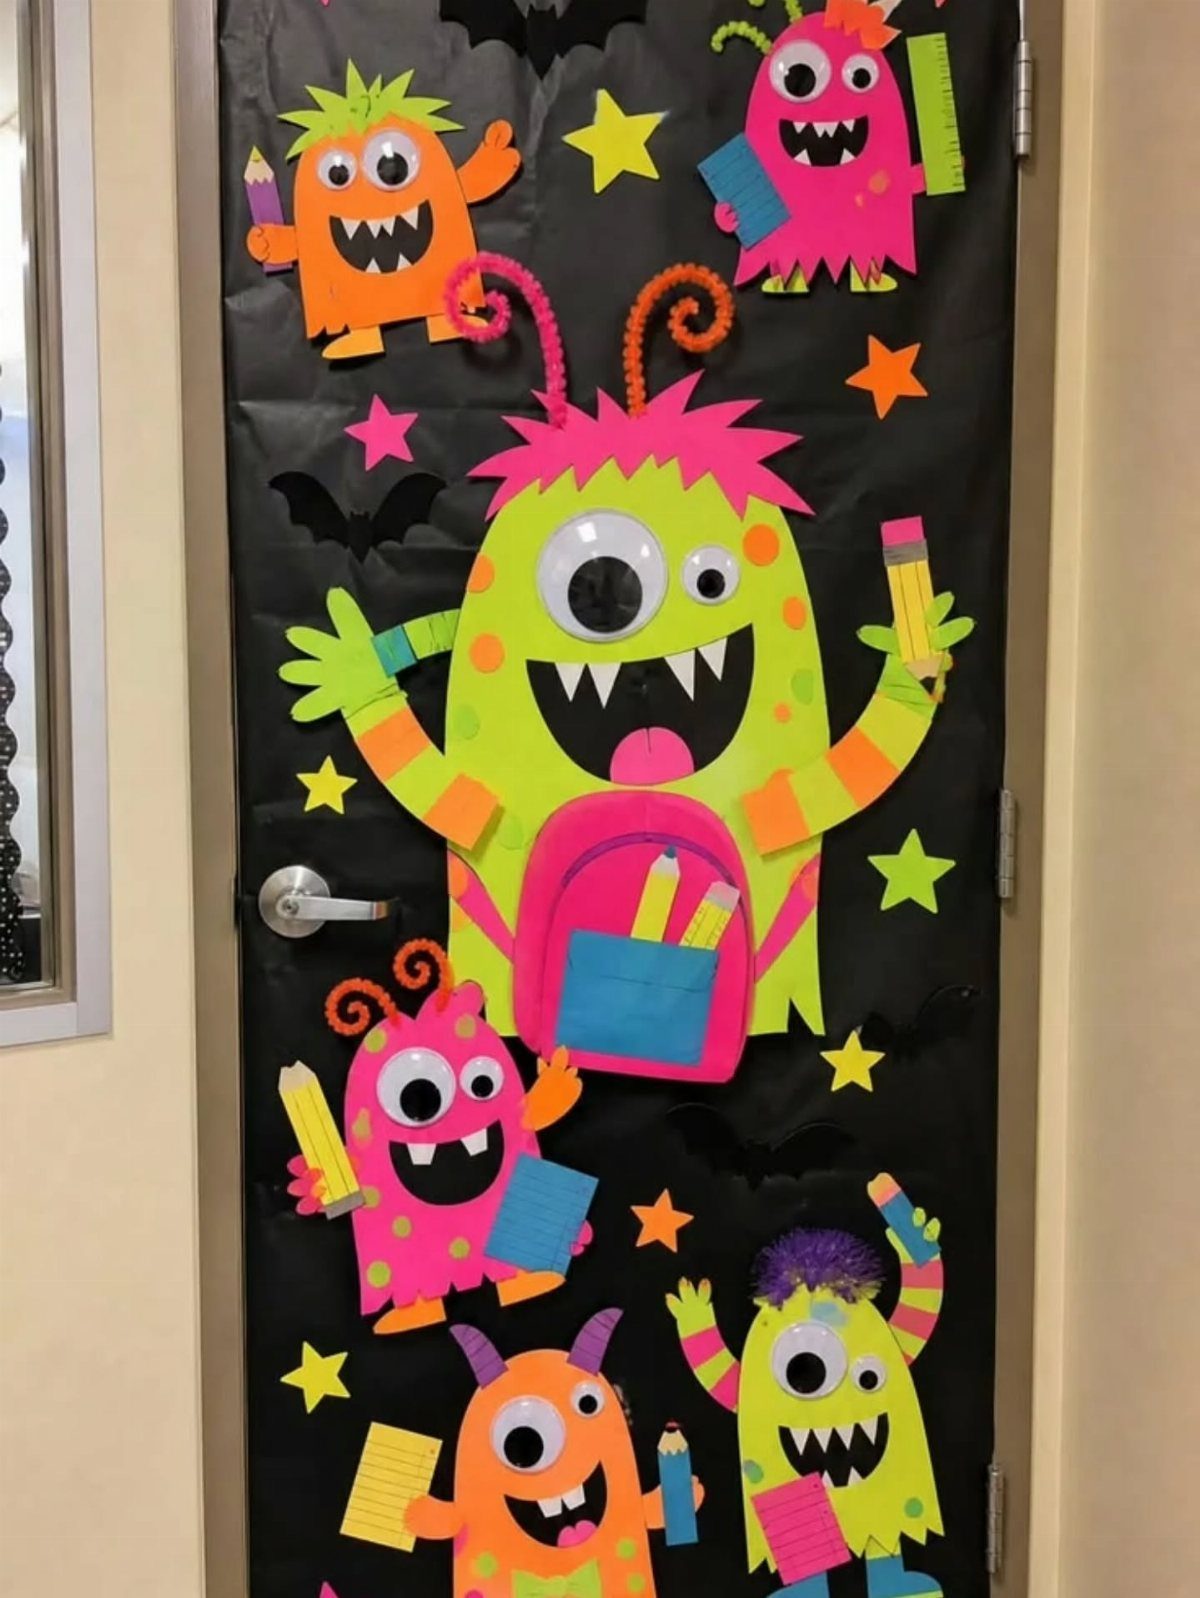
Paper monsters let every student leave a mark on the door. Give each child one sheet of colored paper for the body, plus scraps for eyes, teeth and arms.
A black background makes bright colors pop, so it beats white for this door.
Have each monster hold a school supply, like a pencil or a book, so the door ties back to class. Stars and bats fill the gaps.
5. Ghosts with Student Names
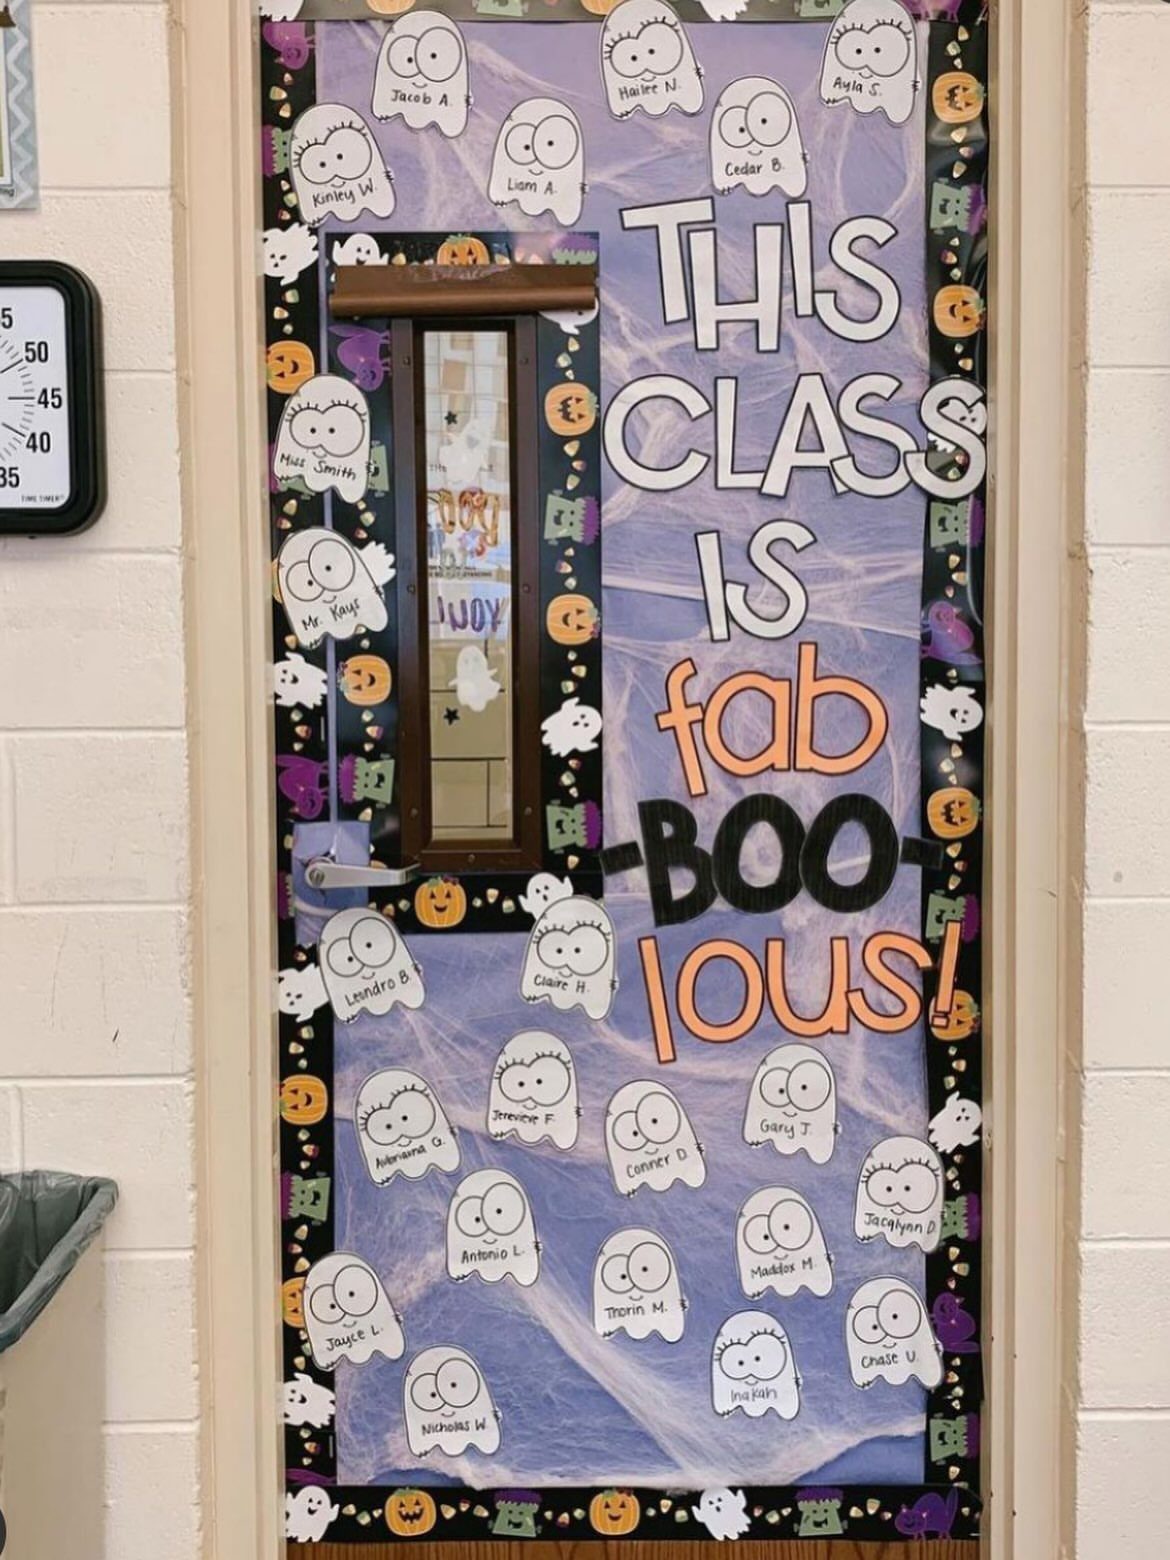
Each child’s name on a ghost is the cheapest way to make a whole class feel included. White paper, a marker and scissors are the entire supply list.
Cut the ghosts in a wavy-bottomed shape and write names in thick black marker so they read from a distance.
Purple paper behind them lets the white stand out. The "fab-BOO-lous" sign is a pun you can reuse with any class.
6. Frankenstein Door
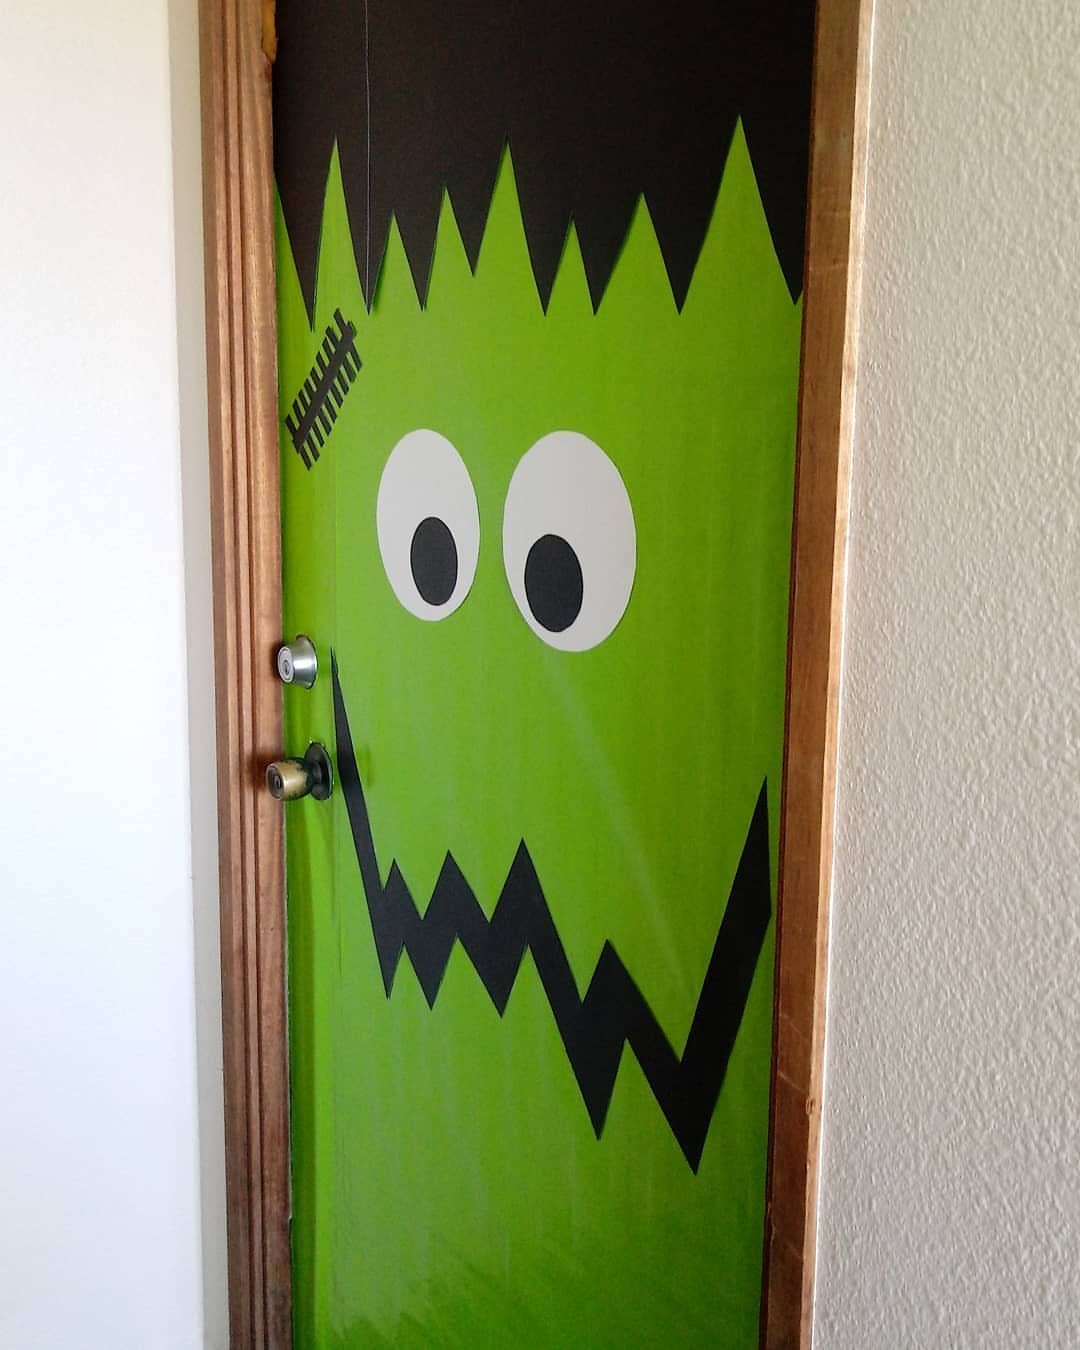
A green face with a stitched scar is the friendliest monster you can build from paper. Green paper covers the door, black makes the hair, and white fills the eyes.
Cut the hair in jagged points and draw the scar with a thick marker.
Keep the mouth a little goofy, with big eyes, so younger students laugh instead of flinch. The door itself is the face, so the whole project takes only a few sheets.
7. Mad Scientist Theme Door
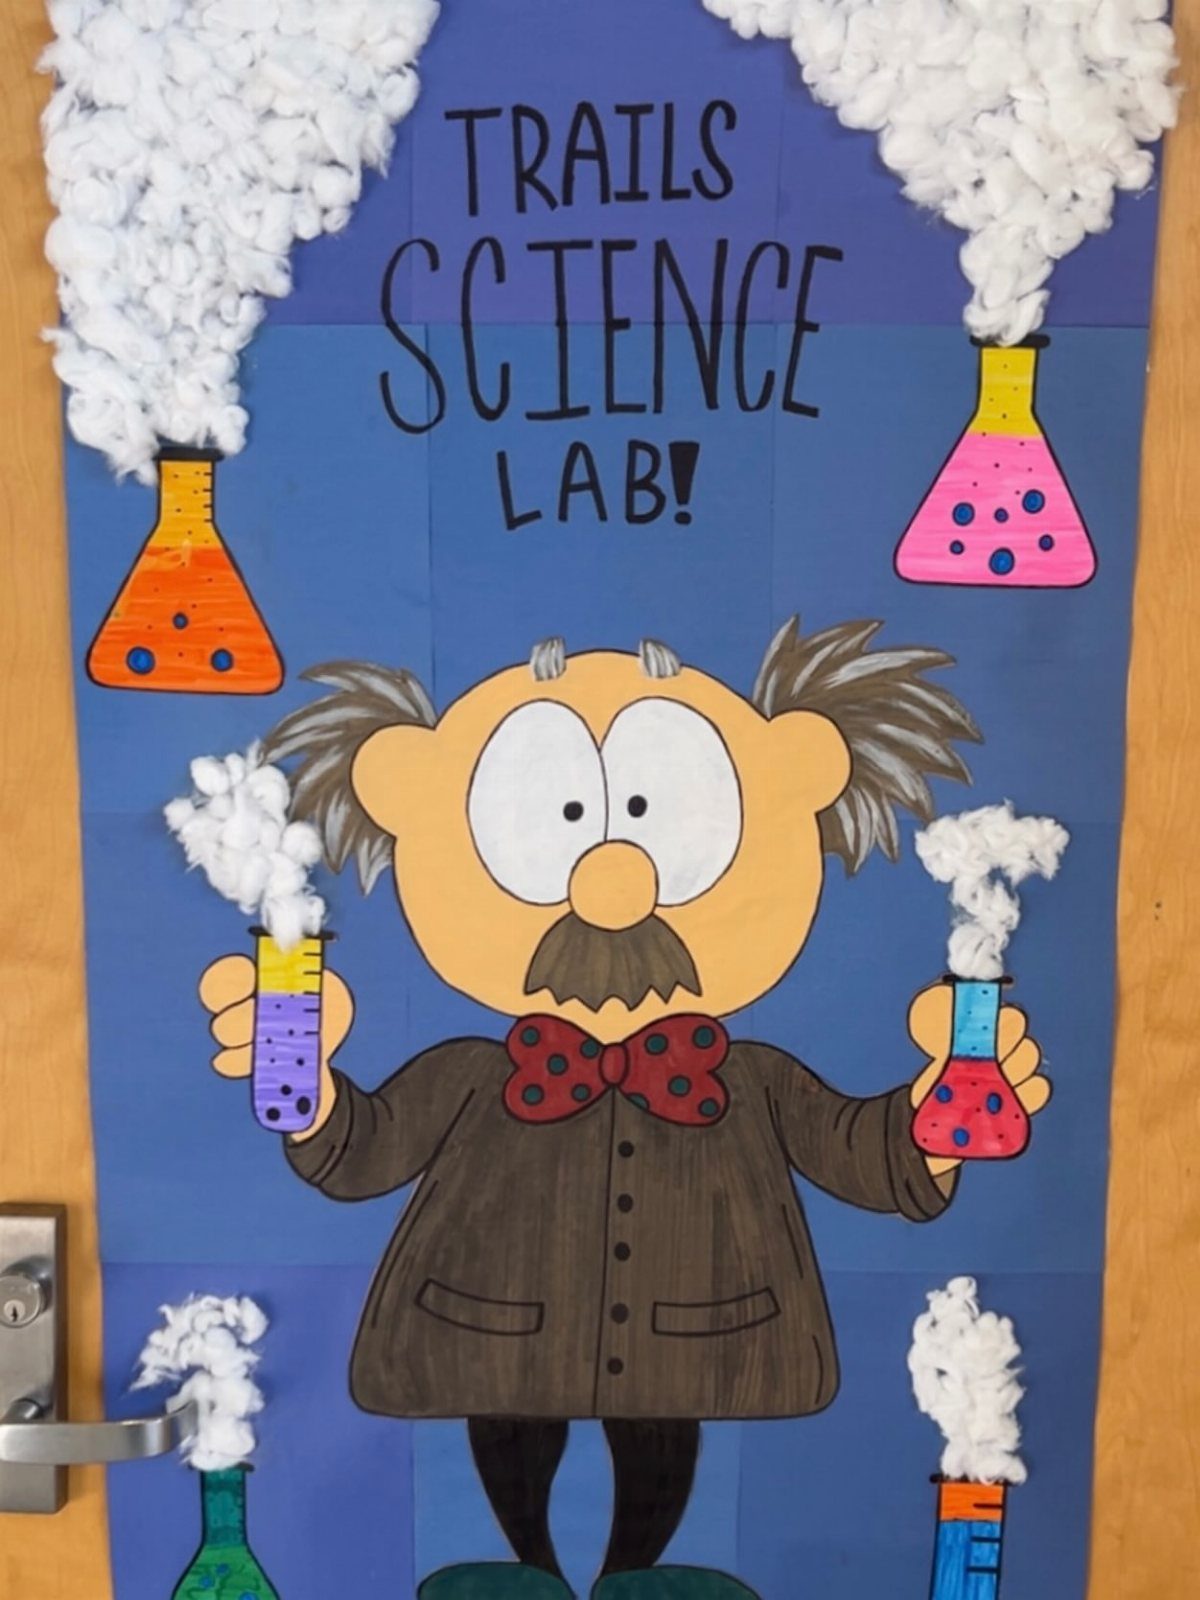
A mad scientist door gets its energy from the bubbling flasks. Cotton balls pulled thin make smoke that looks soft and a little messy, which is exactly right for a lab.
I would cut the flasks from colored paper in a few contrasting shades and let the cotton spill over the top edge.
Put the lab name in big block letters so it reads from the hallway. Blue paper behind everything keeps the bright liquids easy to see.
8. Scarecrow Door
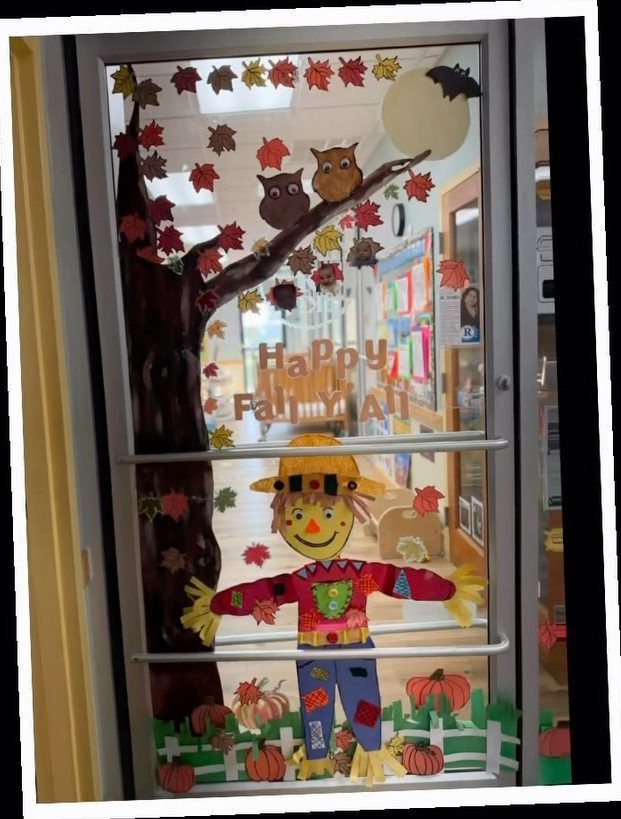
Fall, not fright, is what a scarecrow door sells, and that makes it the gentlest pick for a school hallway. It works for a teacher who wants a door that can stay up from October straight through November.
Build the scarecrow from brown, tan and orange paper, and add a tree with paper leaves for height.
Owls and small pumpkins fill the empty corners. A short rhyming greeting in thick letters ties it together.
9. The Nightmare Before Christmas Door
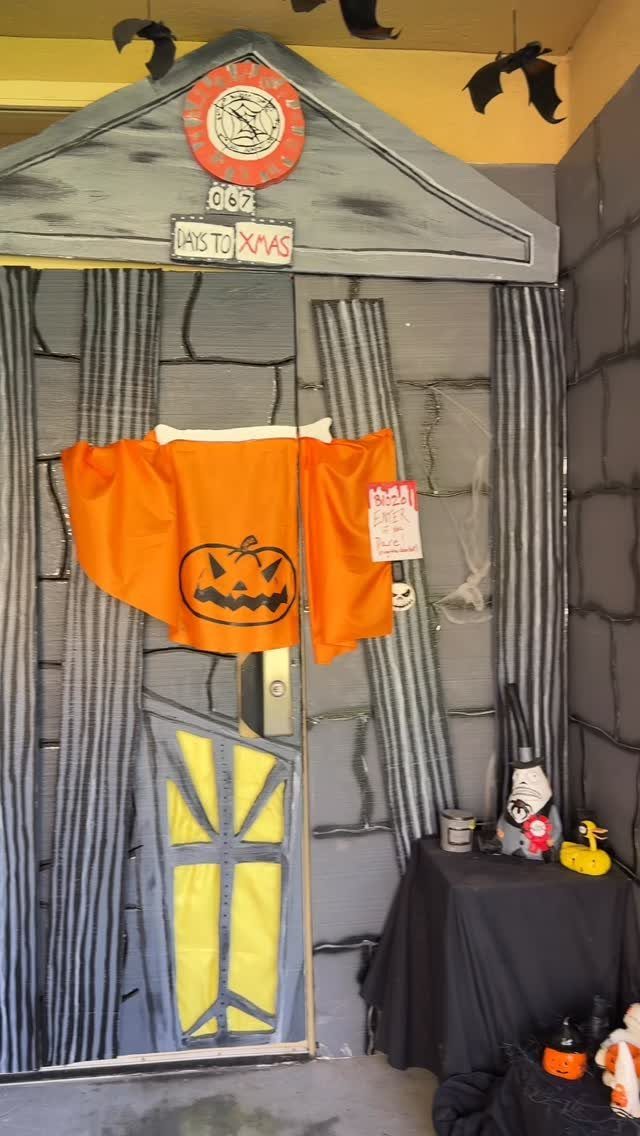
For a Nightmare Before Christmas fan, the door should look like a stone house with a pumpkin-patterned shirt hung on it. A countdown sign to Christmas is the clever extra, since the film sits between 2 holidays.
Gray paper with a drawn brick pattern gives the stone look cheaply.
Add a few black paper bats. Change the number on the countdown each week, or the sign will be wrong by Friday.
10. Trick or Treat Socks
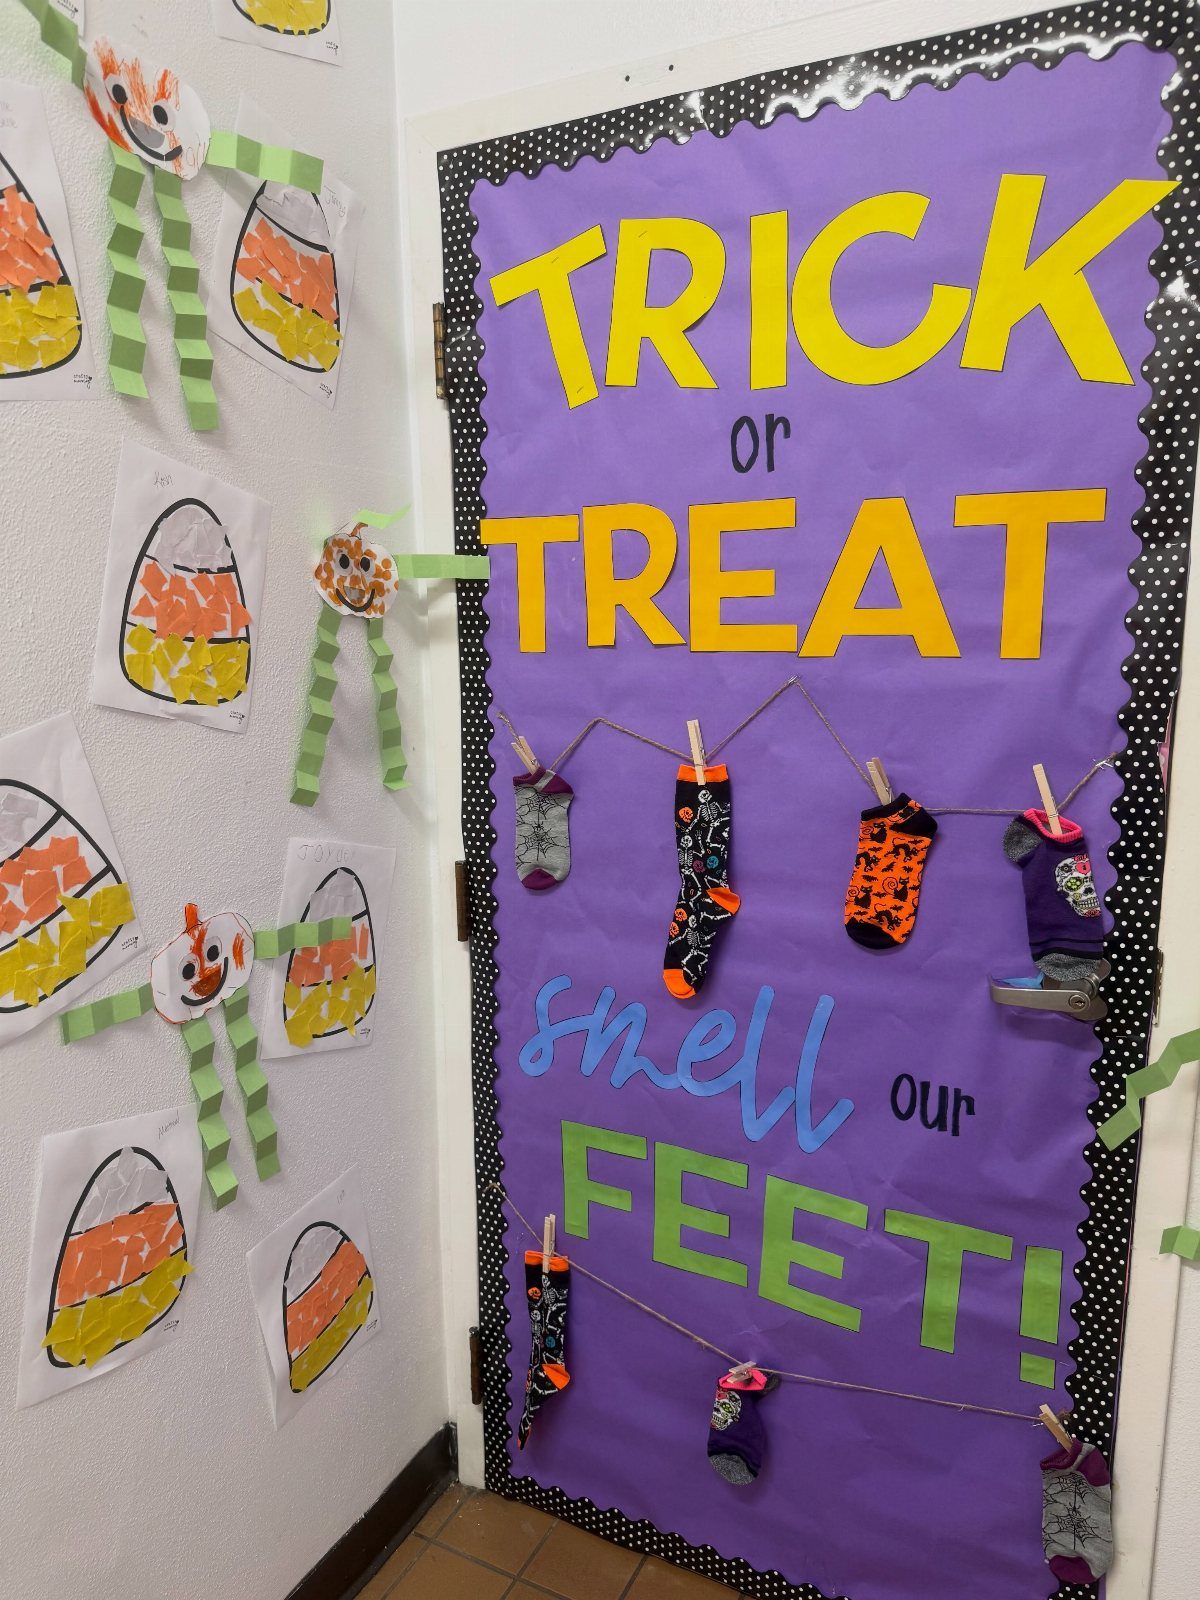
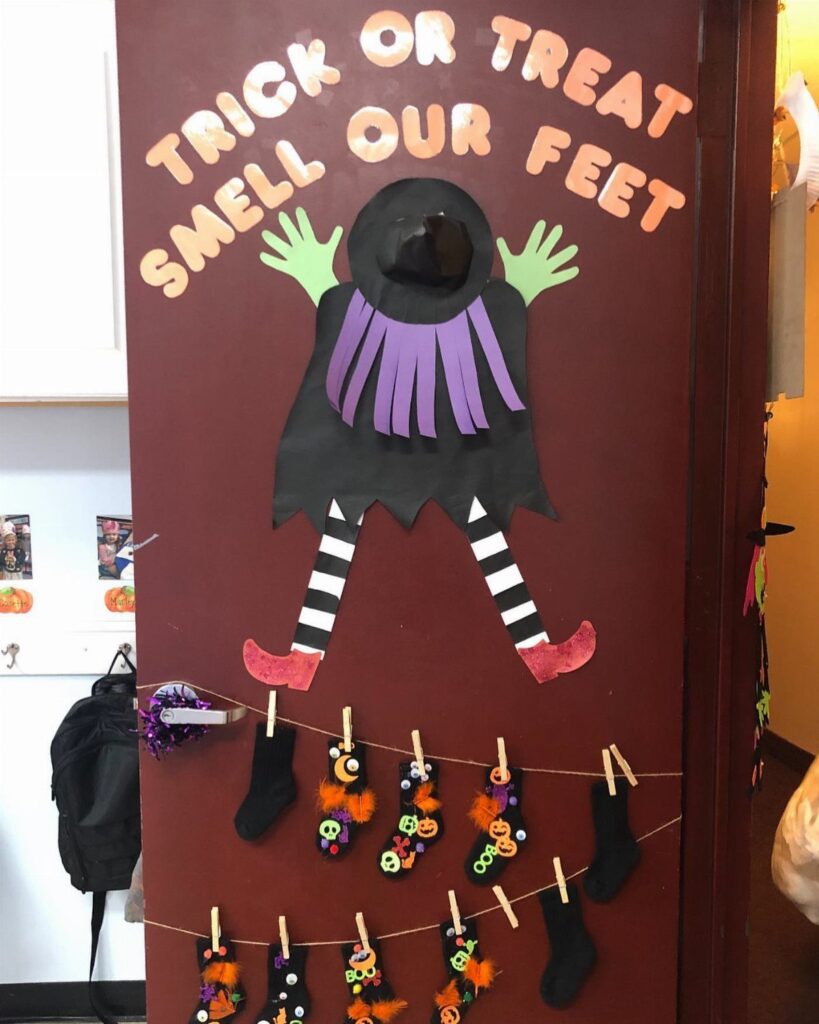
Hanging real socks from a string is the funniest low-effort move for a Halloween door. Pairs with Halloween prints look best, and a clothesline across the door holds them without tape on the fabric.
Clip each pair with a mini clothespin so you can take them down later.
Thick yellow letters on a purple door make the pun readable from far off. Thrift-store or dollar-bin socks keep the cost low.
11. Caution Tape
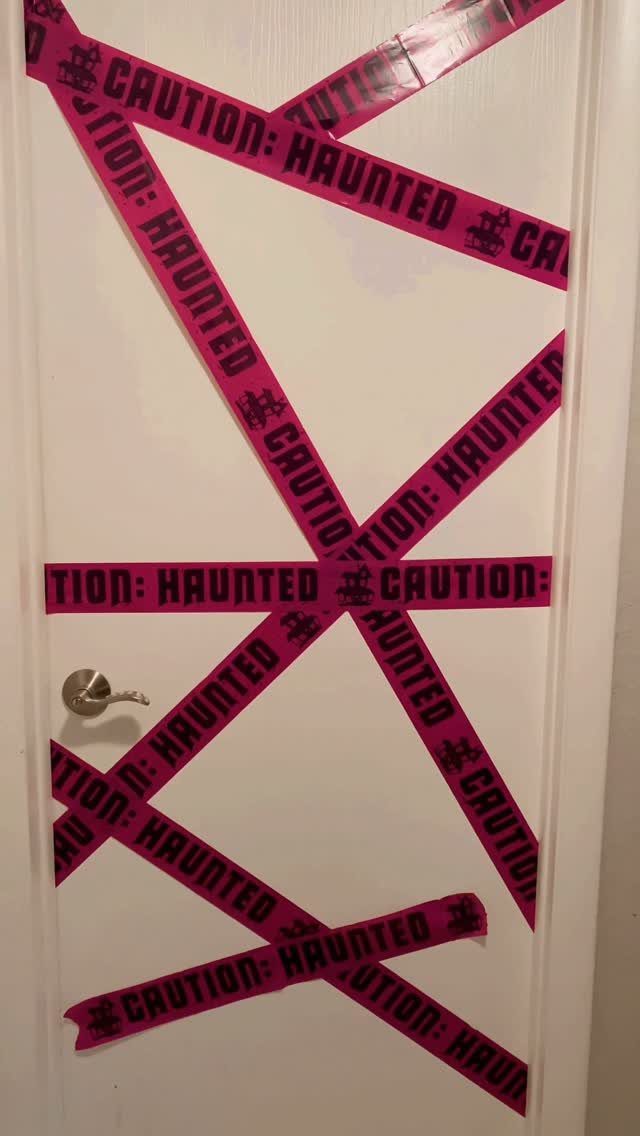
Caution tape is the cheapest spooky door I know. The maker of this one grabbed a roll at the dollar store for $1.25, which is hard to beat.
Run the strips in an X across the door, pulling each one taut before taping the ends to the frame.
Tape on the frame, not the door surface, so nothing peels paint. A white door shows the tape colors well, and this needs no cutting at all.
12. Monsters, Inc. Inspired Door
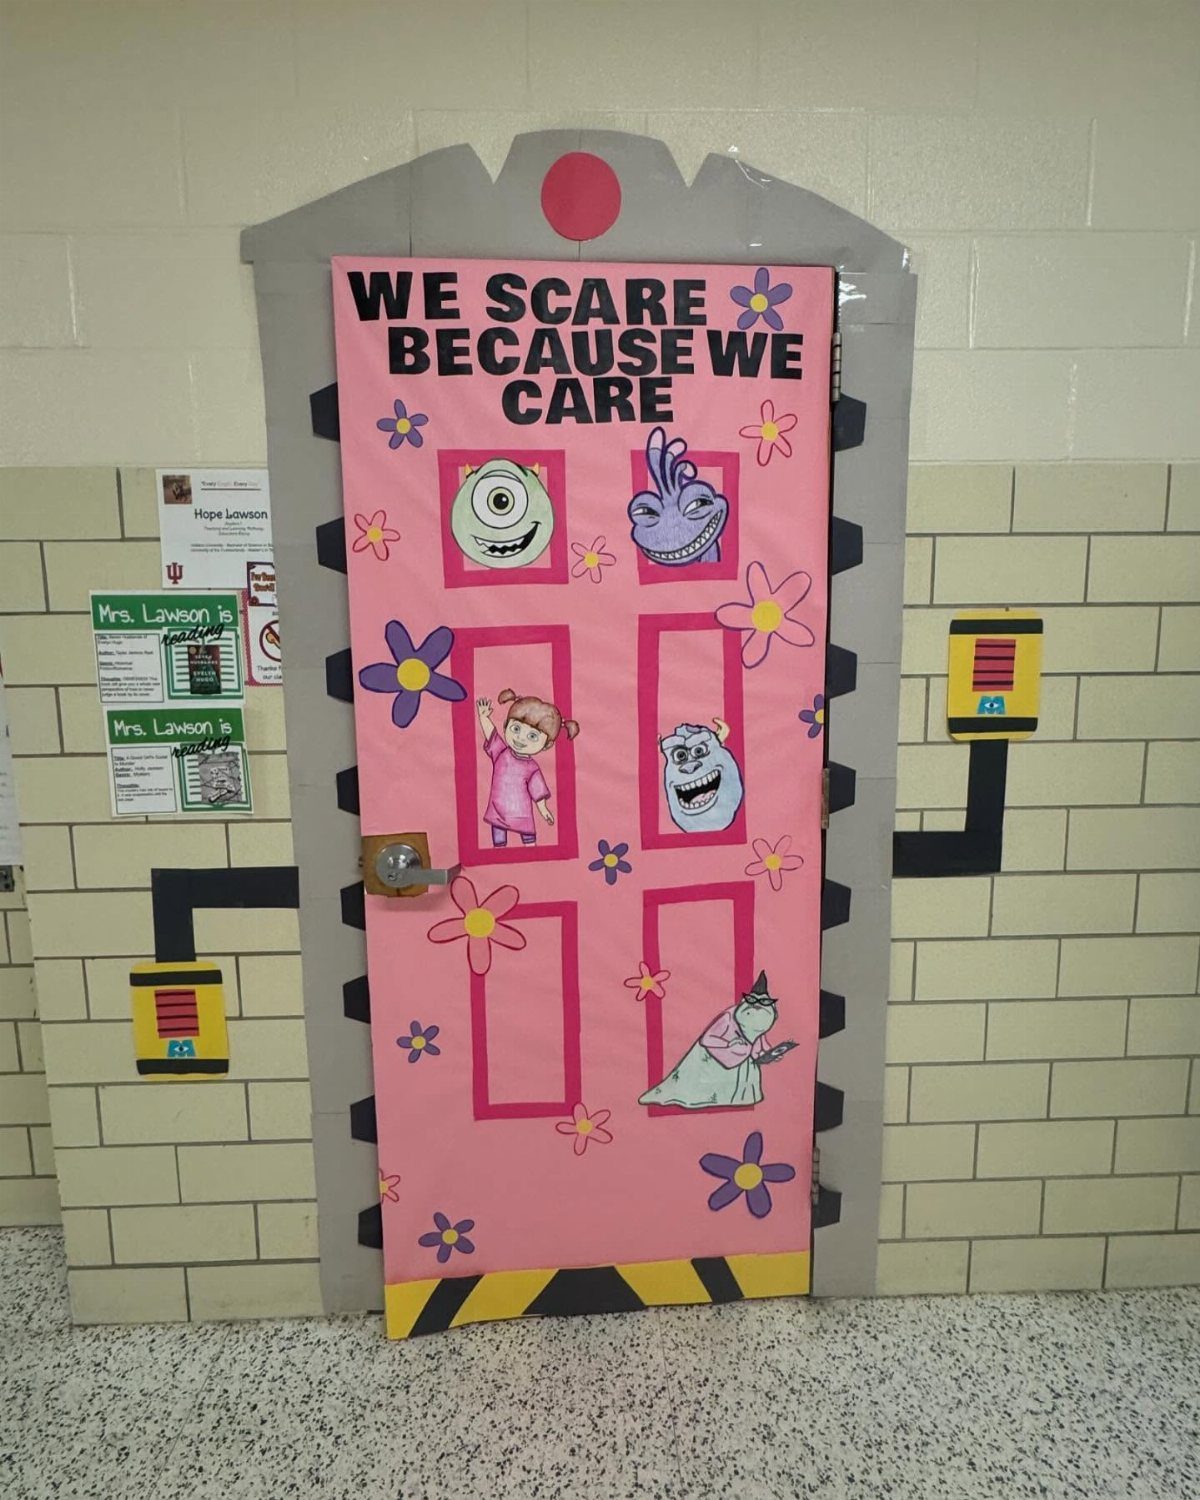
"We scare because we care" is a line that suits a classroom better than most Halloween slogans. It tells students the monsters are friendly, which helps with the youngest ones.
Cut the monsters from bright paper, with big round eyes and mismatched teeth, and let each one overlap the next.
Flowers in a second color soften the pink background. Print the phrase in large letters and give it its own clear space at the top.
13. Going Batty Door Frame
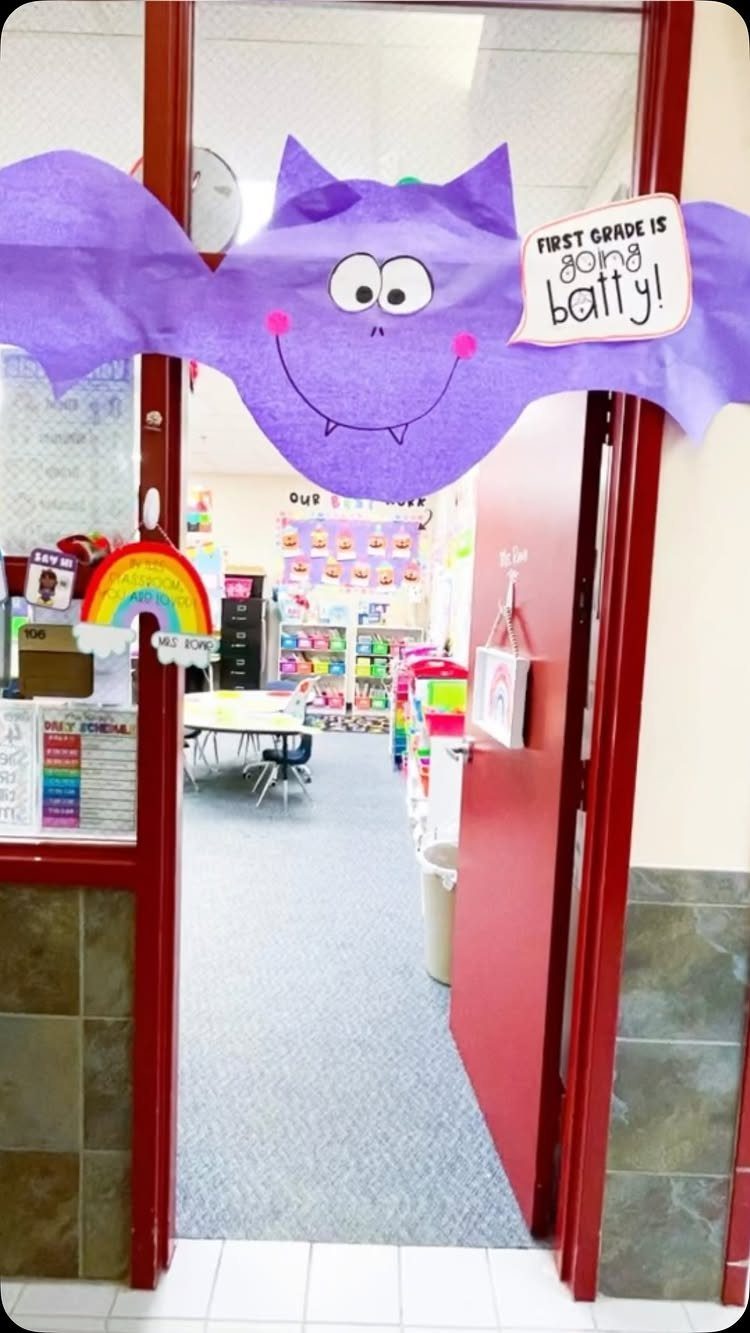
A single oversized bat can carry a whole doorway, and the speech bubble gives it a voice. "FIRST GRADE is going batty!" works because the class name sits right in the joke.
Cut the bat from one big sheet of purple paper, with wings wide enough to span the frame.
Write the bubble in thick marker so it reads from down the hall. Swap the grade for your own and the sign is ready.
14. Anime Themed Halloween Door
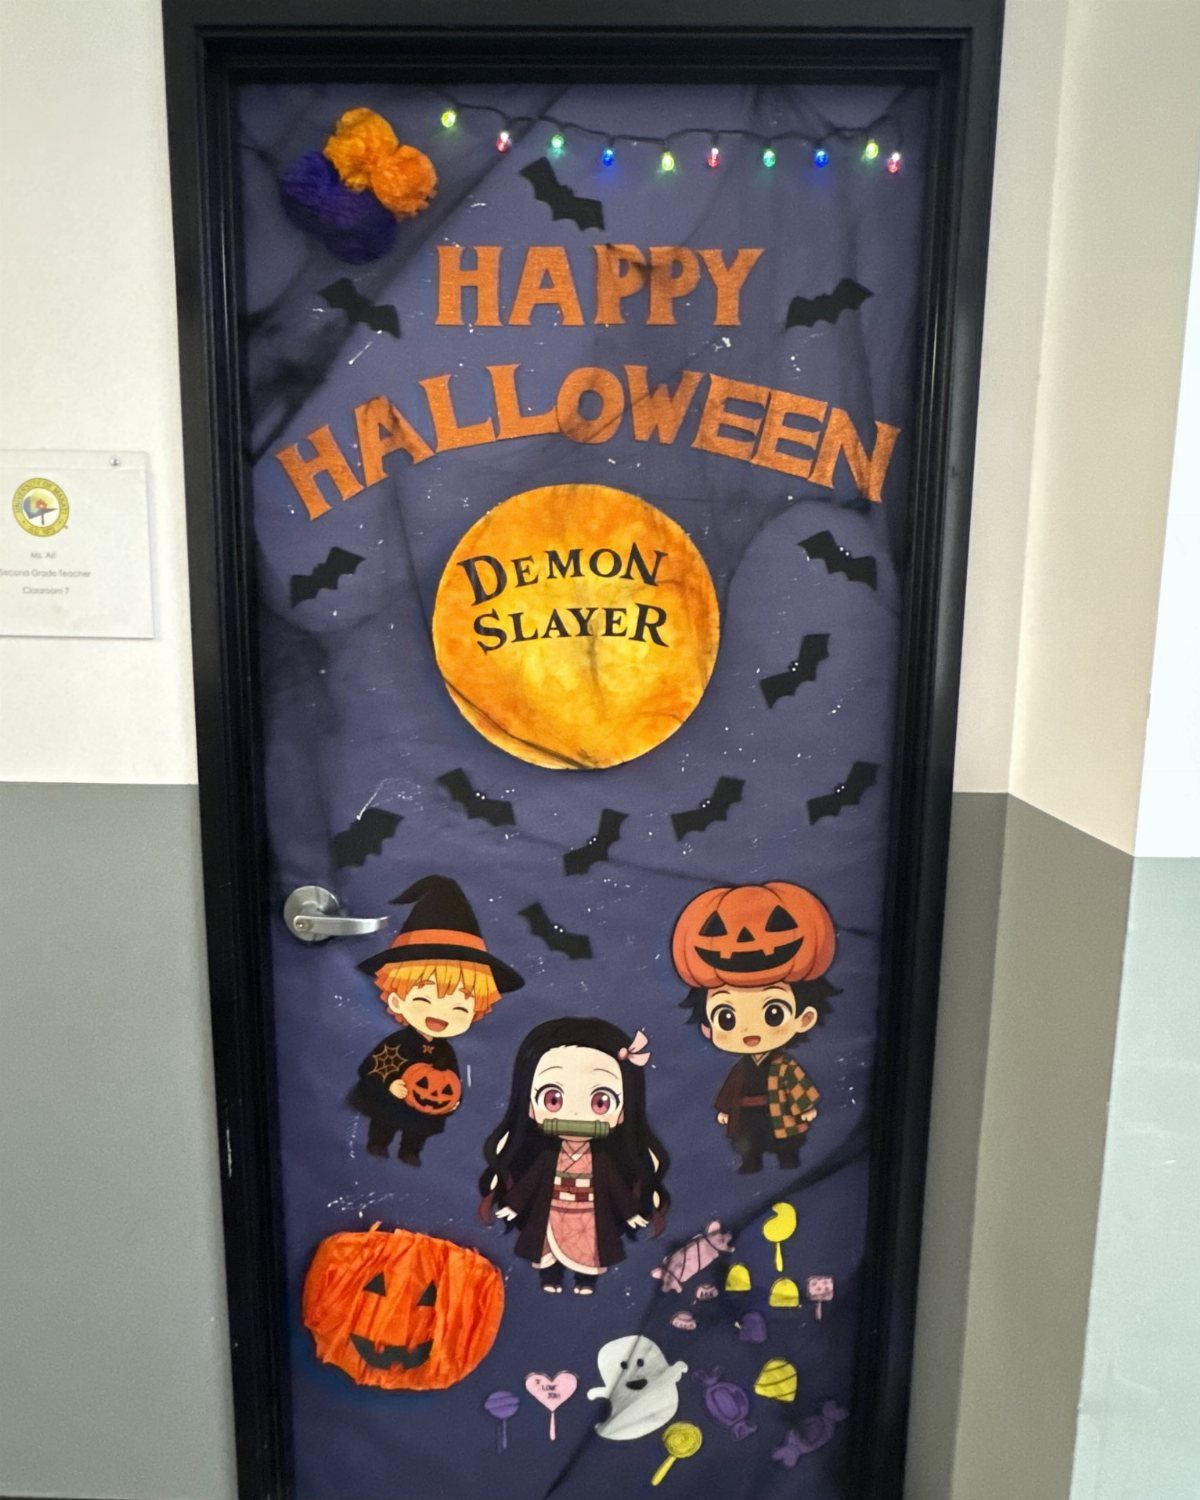
Fan art turns a door into a conversation starter, and Demon Slayer characters in Halloween costumes will stop students in the hallway. Pick the show your class actually talks about.
Draw or print the characters, then cut them out and mount them on a purple background.
Big orange "HAPPY HALLOWEEN" letters give older students a clear headline. Pumpkins and bats fill the gaps, and a string of lights adds glow for almost no money.
15. Boarded-Up Zombie Door
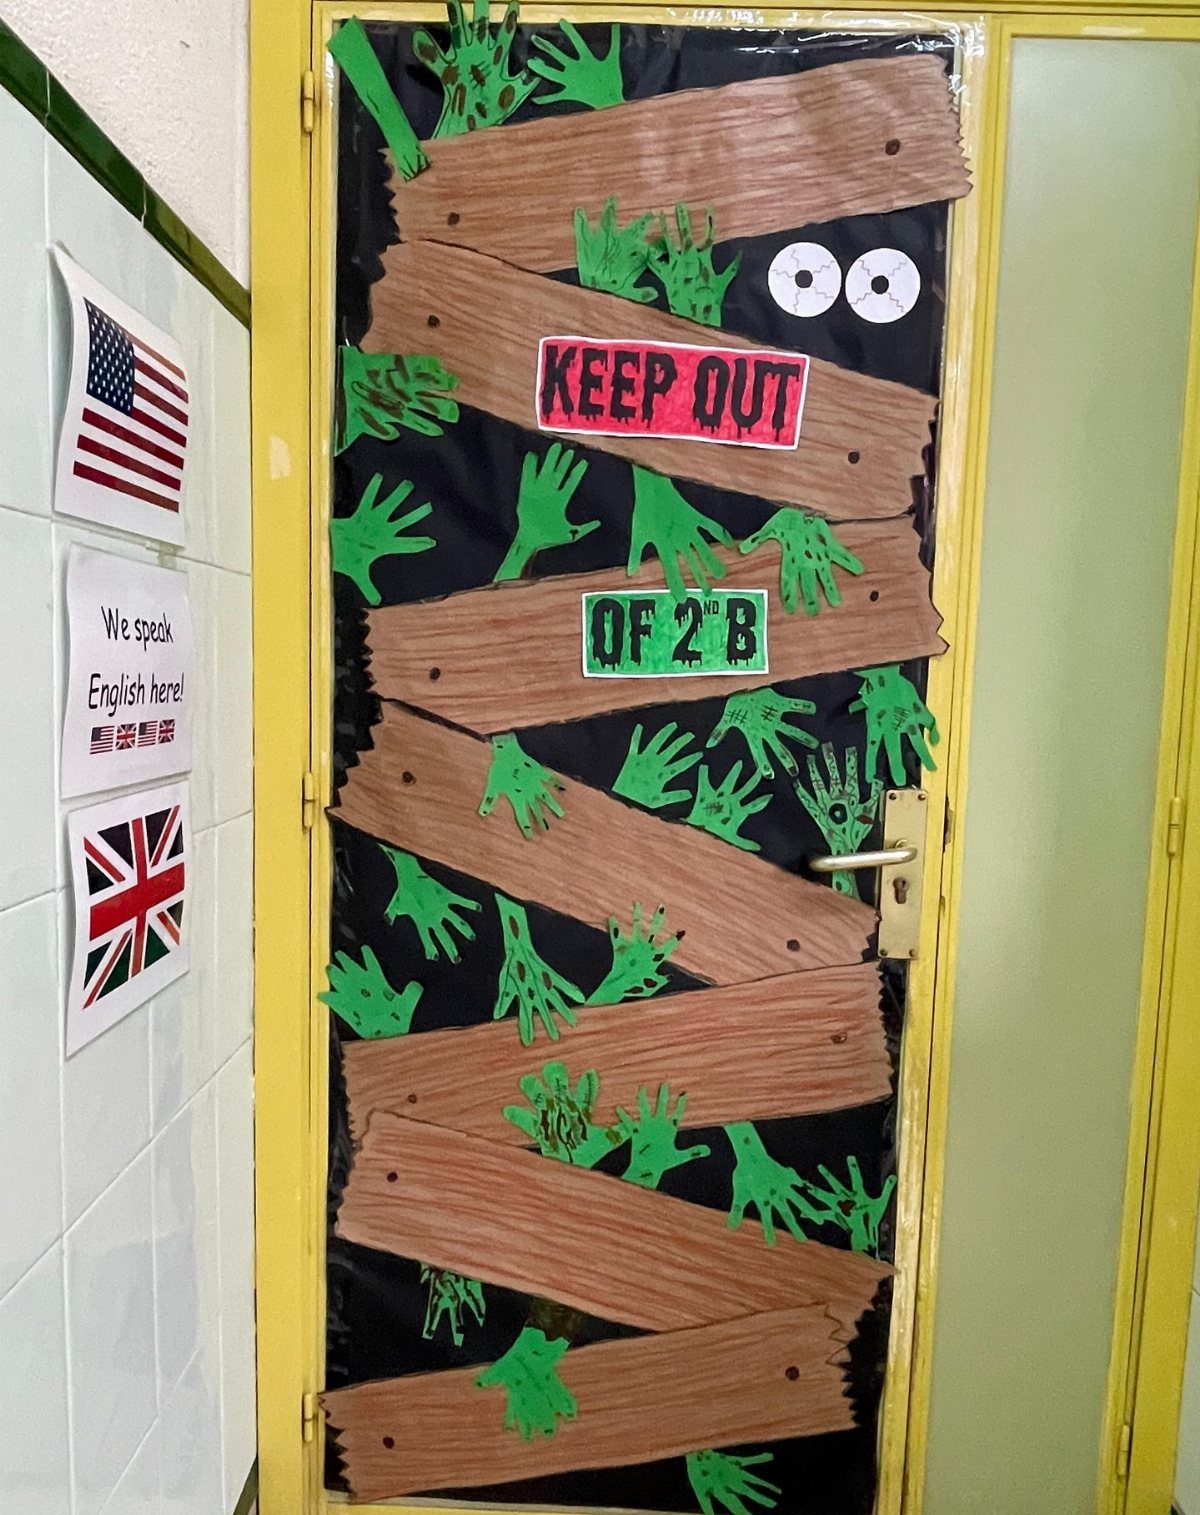
Zombie hands reaching through boards say "undead" better than any slogan. Black paper covers the door, and brown cardboard strips become the planks.
Cut the planks in uneven lengths and lay them across at angles, so the boarding looks hurried. Green paper hands go in the gaps, fingers spread.
Big block letters spelling "KEEP OUT" belong on top of the boards, where they read first from the hallway. Cardboard from a delivery box costs nothing.
16. Let’s Get Spooky Door
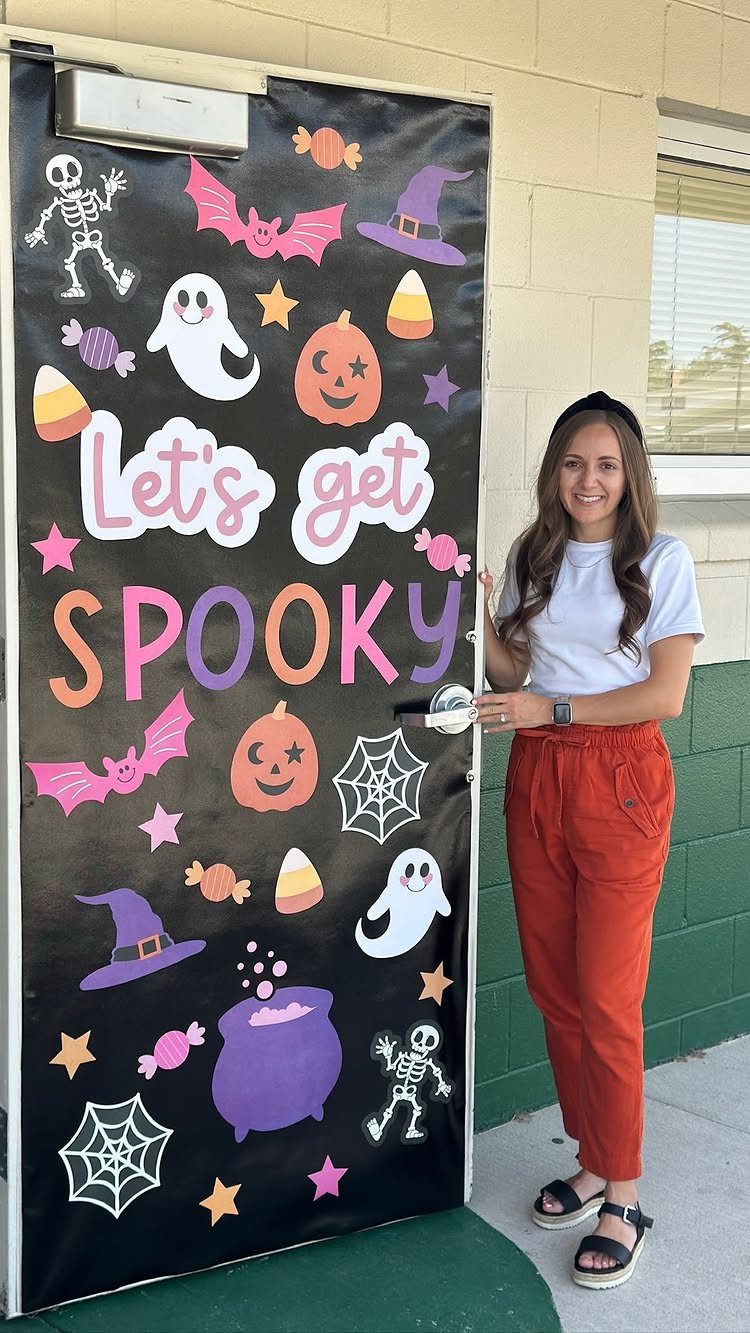
Black makes every other color on a door look brighter, and "Let’s get SPOOKY" gives you a headline that fits any grade. Mixed Halloween icons are the filler.
Cut a pumpkin, a ghost, a bat and a few more shapes in bright paper, then scatter them around the lettering.
I would make "SPOOKY" a different color from the other words, so the eye lands there first. Leave some black showing between shapes.
17. Boo Guess Who Door
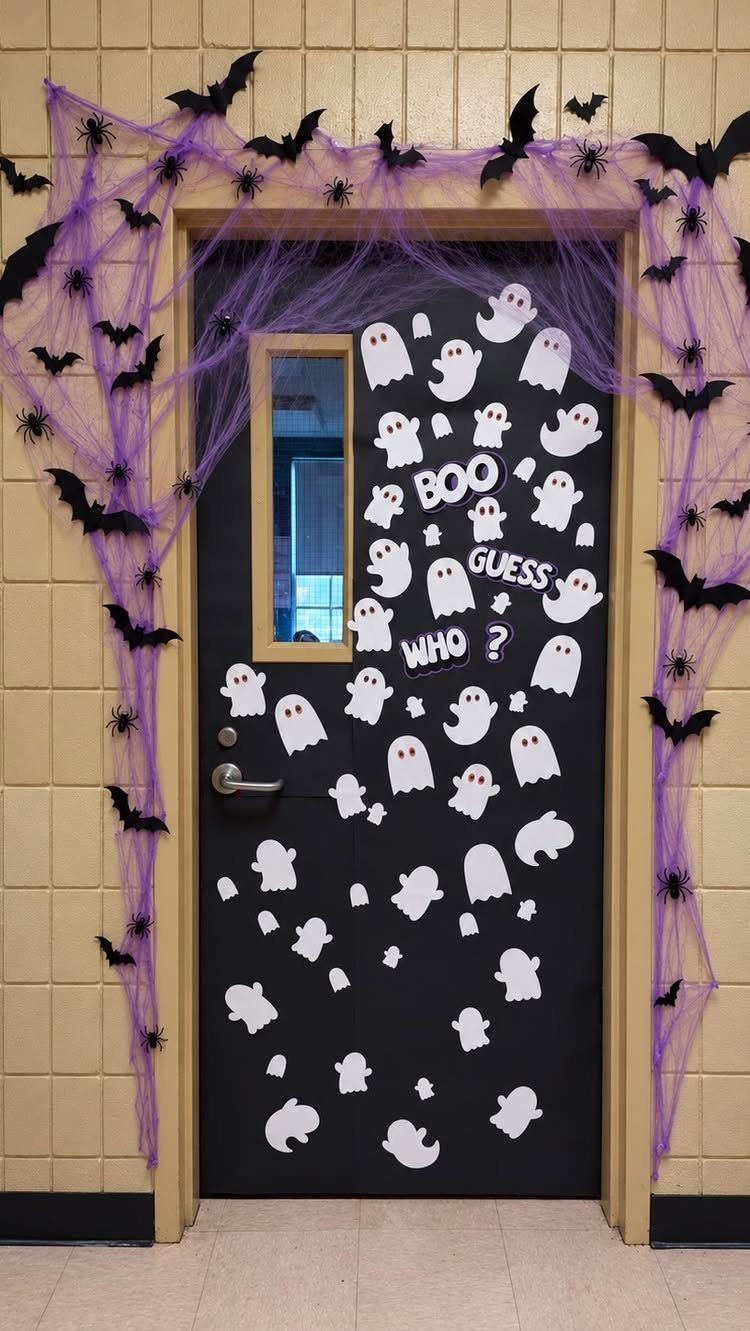
A guessing game gets students looking closely, and "BOO GUESS WHO?" invites them to try. White ghosts stand out sharply against a black door.
Cut the ghosts in different sizes and hide a photo or a name under each flap, if you want the guessing to be real.
Stretch purple webbing loosely across the corners, then add black paper bats. Use thick lettering, since the white and purple compete with the sign.
18. Spooky Keep Out Door
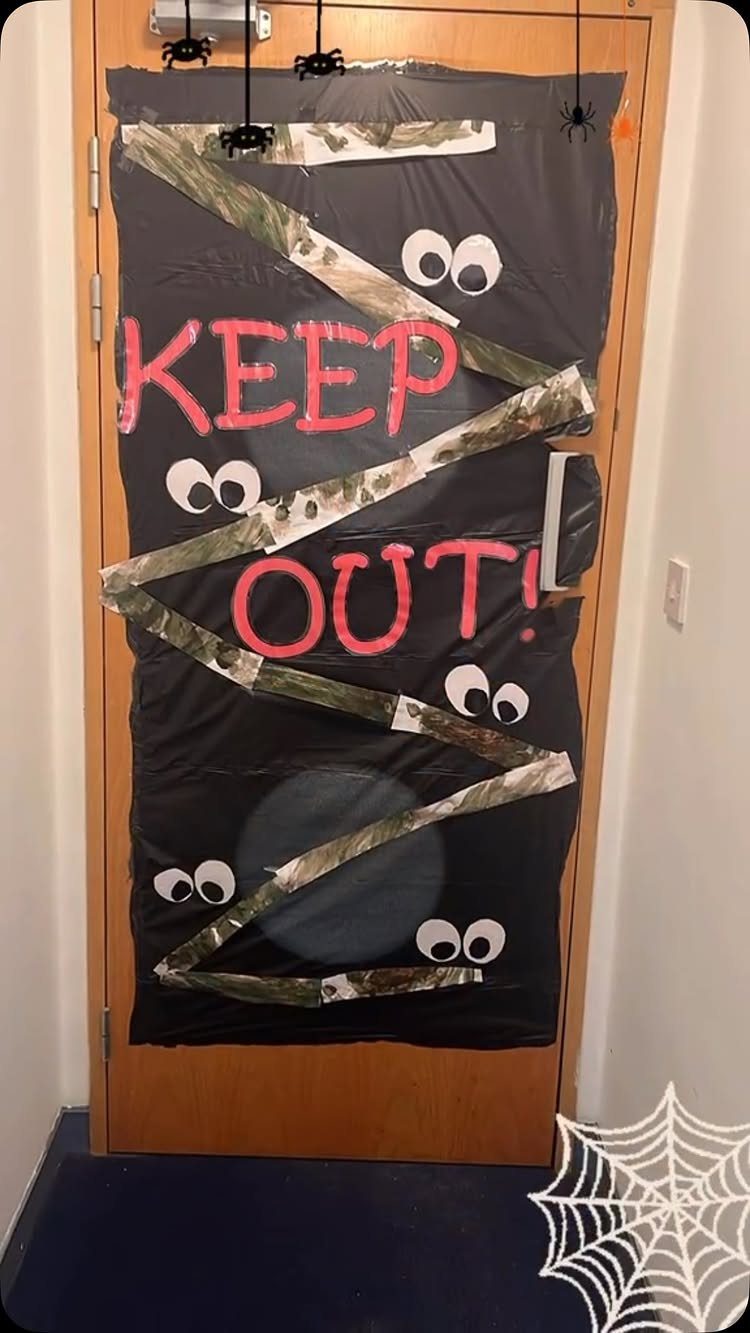
Black plastic sheeting makes a door look sealed shut, and it costs little. Crisscross camouflage tape over it, add red "KEEP OUT!" lettering, and the message is clear.
Googly eyes peeking from the dark are the funniest touch.
Stick them on in uneven pairs and add a few paper spiders. Smooth the plastic before taping, and fasten it at the frame edges so the door can still open.
19. Skeleton Night Sky Door
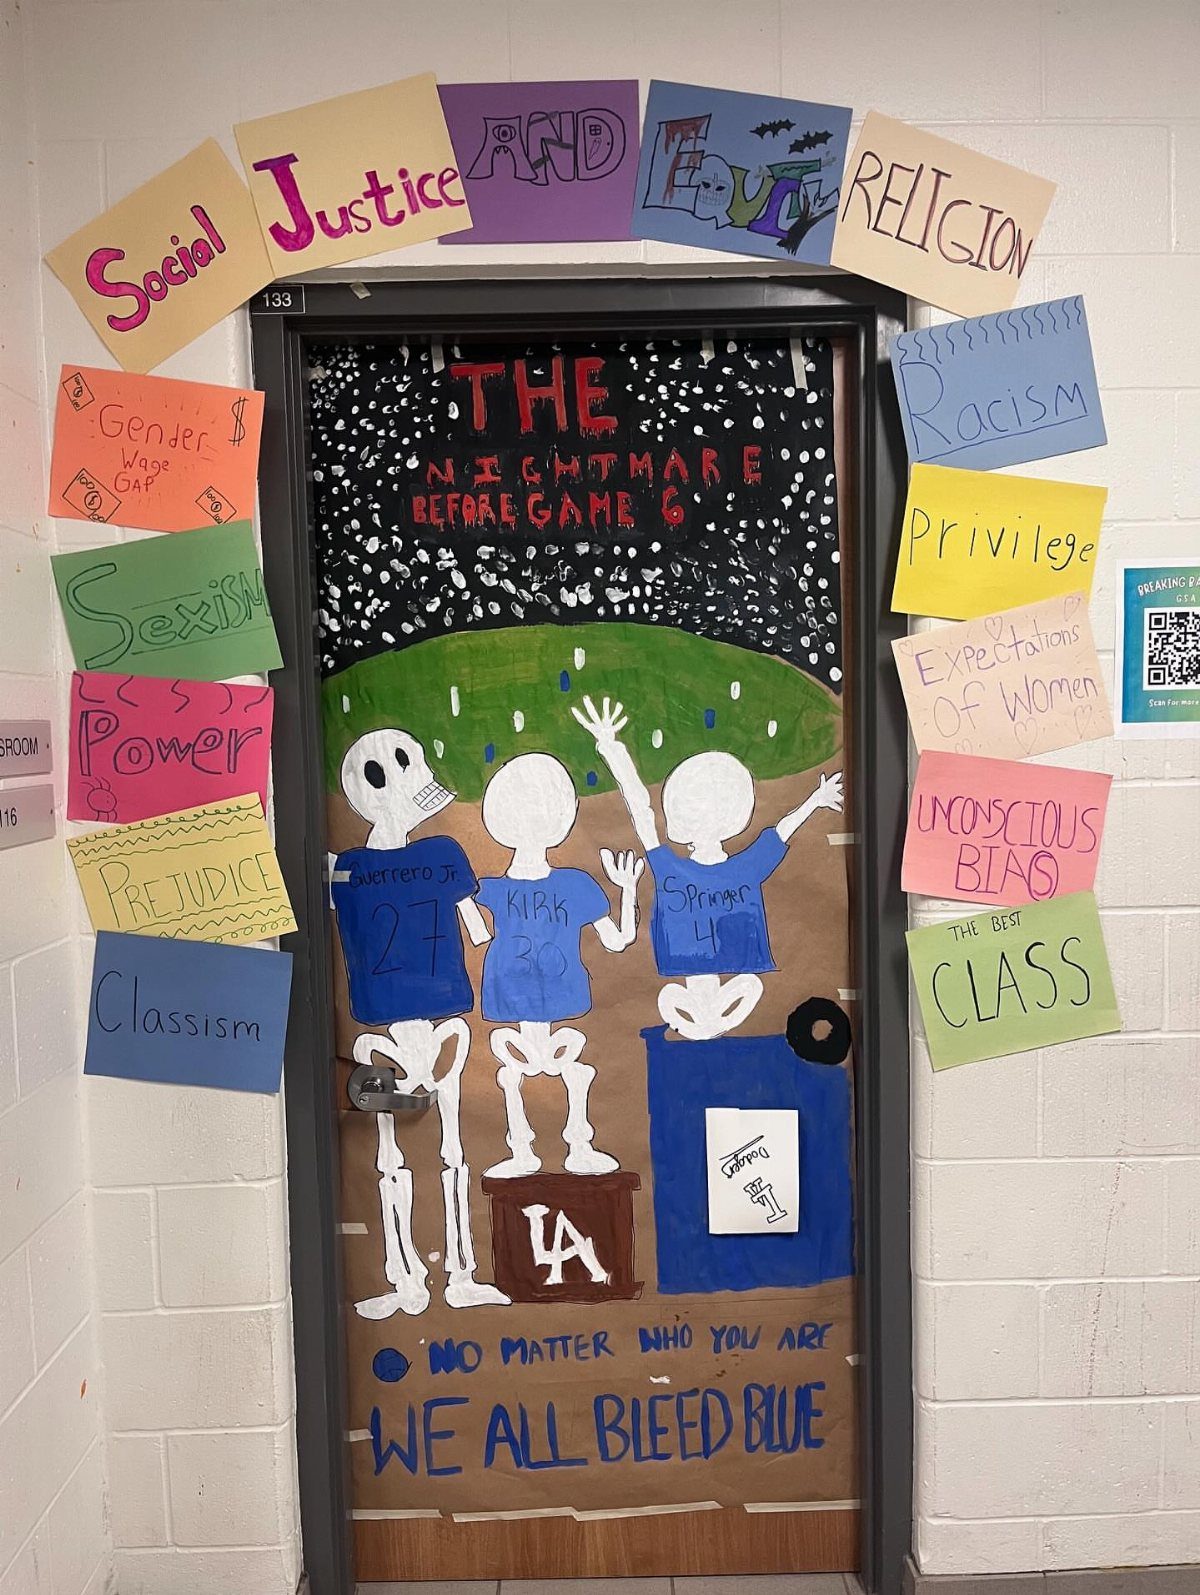
A starry night sky behind 3 skeletons in blue shirts gives this door a calm, dark backdrop that lets the signs do the talking. The "Nightmare Before Game 6" line shows a Halloween door can carry a class topic.
Use dark paper for the sky and cut small stars in a light color so they read against it. Pick sign colors that contrast with the black, and keep the lettering thick enough to read from the hallway.
Match the signs to what your class is actually studying, so the skeletons serve the lesson.
Involving Students in Decoration
Ownership starts with a small decision, so hand students one before any paper gets cut. Let them vote on a color or pick which creature they want to make, and they will defend the door for weeks.
Eyes work well for younger classes. Have each child cut or draw a pair of eyes and stick them on a ghost, monster or bat; the door fills with faces without anyone needing to draw well.
A big paper moon works well as a name board: each student writes a name on a bat wing, and the whole flock swoops across the door.
Another option is DIY jack-o-lanterns, where each child gives the face their own spin. Set a small box of finished pieces by the door so the work is easy to add.
Budget-friendly Materials
Construction paper, markers and scissors cover most of a door. Pre-cut a batch of pumpkins, ghosts or bats and hand them out for students to color and decorate, which saves you from making every piece yourself.
Texture is cheap too. Crepe streamers, paper chains and stretched cotton balls for spiderwebs give the door layers and texture for just a few dollars.
Ask parents to donate supplies, or save recyclable materials like cardboard and bulletin board scraps. Before shopping, write a checklist: butcher paper, construction paper, adhesive, scissors and any extra props.
Check safety as well. Pick materials that suit the age group, are non-toxic and are flame-resistant; that last one matters most near hallway lights and heaters.
Changing Decorations Throughout October
Treat the door as a month-long project rather than a one-day build. Open October with a bare pumpkin patch, then add ghosts, bats or candy corn each week so the door keeps changing right up to Halloween.
Plan the base layer first.
Pick one main theme and two or 3 colors, such as orange, black and white, or a softer mix like cream, brown and orange. Start by covering the whole door with a base layer of butcher paper or bulletin board paper.
Add the largest piece first, then fill gaps with smaller ones: bats, pumpkins, ghosts, stars, candy or spiderwebs. Save your classroom saying for last, so it sits clear of the clutter.
Each week, add a few pieces and the door stays fresh.
Frequently Asked Questions
How do you decorate a classroom door for Halloween?
A 3-color palette keeps the design clean: orange, black and white for bright contrast, or cream, brown and orange when you want something softer.
Start with butcher paper as the base, then layer cutouts on top so nothing floats in empty space. The text goes on last, after the art is placed, so it reads against a clear background.
What are some popular items for Halloween door decorations?
Pumpkins, ghosts, bats, spiders and big-eyed monsters are the usual picks, and they all cut easily from construction paper.
Googly eyes, cotton balls pulled into webs and crepe streamers add texture for a few dollars. Fall touches like leaves or small pumpkins also work if you want the door to stay up past Halloween.
How can I get students involved in the door design?
Let students vote on one part of the design early, like which monster or which background color, and they will care about the finished door.
Even kindergarten can handle drawing eyes or cutting simple shapes to glue onto a larger figure. Another option is a big paper moon with each child’s name on a bat wing, or homemade jack-o-lanterns where each face is different.
Can a Halloween door tie into what students are learning?
Yes. Give the monsters a prop that matches what the class is reading or studying that week.
A pun or riddle on the door sign ties the decoration to the lesson without losing the Halloween mood. The skeletons then serve the lesson instead of just filling space.
How do you keep a Halloween door fresh all October?
Roll out the design across the month instead of finishing it the first week.
Put up a blank scene on October 1st, then tape a new piece to it every few days so the door changes as the month goes on.
A scarecrow or pumpkin patch door is the better choice if you want it to last into November.